{1,2,3,4}

(This is wonderfully obtuse, but amused me :)

Neil Henning (@sheredom) asked:

SPU gurus of twitter unite, want a vector unsigned int with {1, 2, 3, 4} in each slot, without putting it in as elf constant, any ideas?

Interesting question. The SPU ISA generally doesn’t help build vectors with different values in each slot. In this case, there are only very small values required in each register, so it can be done with a neat little trick.

My answer:

    fsmbi r4, 0x7310  # r4 = {0x00ffffff, 0x0000ffff, 0x000000ff, 0x00000000}
    clz r5, r4        # r5 = {8,16,24,32}
    rotmi r6, r5, -3  # r6 = {1,2,3,4}

Instructions are:

  • fsmbi — form select mask byte immediate. Creates a 128 bit mask from a 16 bit value, expanding each bit of input to 8 bits of output.
  • clz — count leading zeroes. Counts the number of leading zeros in each word.
  • rotmi — rotate and mask word immediate (logical shift right by negative immediate). Shifts each word right by the negation of number of bits specified.

This solution is entirely self contained, required no pre-set state (unlike my first attempt utilising the cbd instruction). In terms of raw instruction size, it’s a whole eight bytes smaller than storing the vector in memory and loading it when needed (that being 16+4 bytes), and a little slower than using a load instruction.

(On a cursory re-examination of the SPU ISA, fsmbi is the only instruction that will construct a different value in each word of a register. A specific pattern may be generated with cbd/cbx that can be used for this problem, but it depends on the contents of another register which limits its already limited usefulness. Combining fsmbi with other immediate instructions allows for a wide range of values to be constructed independent of register state and without access to storage)

TTYtter for the N900

A quick documenting of how I got TTYtter running on the N900/Maemo5.

0. Missing curl

TTYtter requires curl for OAuth, but curl isn’t packaged in the maemo5 repositories (libcurl is — which is frustrating. The particular reason for the frustration will be made clear later…)

That being the case, let’s build curl! I grabbed the sources for the version of curl that matched installed libcurl from the relevant source package page on maemo.org, unpacked the tarball and patch -p1’d the gunzipped patch.

1. What didn’t work

The first half-hearted attempt was to build curl using the cross toolchain I have installed on my gentoo desktop (built with crossdev -t arm-linux-gnueabi). I had little hope that this would just work, and a quick ./configure –host=arm-linux-gnueabi –prefix=/home/user/local && make && make install && scp -r /home/user/local n900: (or something like it) later, it didn’t — the foremost hurdle being that maemo5 uses an antiquated glibc-2.5 (2005, yeah!), and my toolchain uses (and thus generates programs that expect) glibc-2.11.3.

Persisting with my all-too-modern toolchain seemed likely to be a whole lot of effort — I decided to go with what appeared to be the Official method — the probability of success seemed marginally higher.

2. What worked

I installed scratchbox and built it there.

i. Installing scratchbox

I first found this MaemoOnGentoo outline which was got me started. Rather than the emerge command listed on that page, I ended up needing something like:

emerge scratchbox scratchbox-devkit-debian scratchbox-devkit-perl \
scratchbox-devkit-cputransp scratchbox-devkit-doctools \
scratchbox-toolchain-cs2007q3-glibc2_5 scratchbox-devkit-qemu\
scratchbox-devkit-git scratchbox-devkit-svn

As per that page, I needed to re-emerge xorg-server with the kdrive USE flag to build xephyr.

Started scratchbox with /etc/init.d/scratchbox start

From that point on, the Manual Installation instructions for the SDK from maemo.org generally worked — I added a user with /scratchbox/sbin/sbox_adduser, added my user account to the sbox group. (Actually, not really knowing what I was doing, after doing that, I ran the maemo-sdk-install_5.0.sh script, which seemed to do the right thing)

I needed to manually install the Nokia binaries/apps as per the Manual Installation instructions.

That done, I was able to start the SDK UI inside a xephyr window. i.e. Xephyr :2 -host-cursor -screen 800x480x16 -dpi 96 -ac and (inside a scratchbox prompt) DISPLAY=:2 af-sb-init.sh start

(Having the UI running is the Hello, world! ‘proof’ of functionality — it may not count for much, but it’s nice to see)

ii. Building it there

Once there’s a functional scratchbox environment, the next thing to do is to build the package.

I naively followed the relevant parts of the example from the Packaging guide on maemo.org.

Taking the source (as mentioned before — de-tarballed sources with patch applied) it became apparent that the necessary configuration was already in place to build the desired .deb (so much of the guide was unneeded for this task). In fact, from what I recall, the only command from that guide that was necessary was dpkg-buildpackage -sa -rfakeroot -k<my email address> (run using the FREMANTLE_ARMEL tool config)

End result: a bunch of files, including curl_7.18.2-8maemo6+0m5_armel.deb — the frustration mentioned earlier was that the config exists to build this, and that packaging curl for maemo5 would have been approximately zero extra effort.

(Nothing is ever actually zero extra effort. I know this.)

scp curl_7.18.2-8maemo6+0m5_armel.deb n900:, and install with dpkg –install curl_7.18.2-8maemo6+0m5_armel.deb and TTYtter gets the curl.

3. The final bit

TTYtter starts, but it’s not quite working yet. Maemo5 has a prehistoric perl-5.8.3 (2004, woo!) which appears to lack the kind of UTF8 support that TTYtter wants.

To work around this, start TTYtter with the -seven option.

4. Too long; don’t care

The package is here: curl_7.18.2-8maemo6+0m5_armel.deb
(The original source is here with it)

As root, install the package (dpkg -i curl_7.18.2-8maemo6+0m5_armel.deb) and then (as the regular user) grab and run ttytter -seven

TTYtter is by far the best Twitter client I’ve used on this phone — not least because it works.

Smokey Beef Chili with Guinness

This is a recipe I obtained via twitter. I didn’t make a note of the source, and it was shared as text in an image which I printed. I am now unable to locate the original.

I’m re-posting it the original text here (none of the comments within are mine) for the people that have asked me about it with thanks to whoever was responsible — it was enjoyed by my whole family :D

Smokey Beef Chili with Guiness

500 grams of gravy beef
100 grams of streaky bacon
3 celery stalks
2 red chilies
2 red onions
2 green capsicums
8 garlic cloves
1 can of diced tomatoes
2 cans of red kidney beans
150g of tomato paste
500ml beef stock
Dried oregano
Smoked paprika
Ground cumin
Tabasco sauce
Sugar to taste (usually between 1 and 4 teaspoons)
200ml of Guinness
(Optional) 1 can of smoked chipotle peppers

Roughly dice onion, chilies, capsicum and bacon. Finely dice garlic and celery. Add to hot pot with good slug of olive oil and cook until onion becomes semi-transparent.

Meanwhile, cut gravy beef (or chuck steak, or skirt steak) into large chunks. Whack in a food processor and pulse until half the steak has disintegrated and half has been carved up into various random shapes of random size.

Once onion is browned (important) add big teaspoon of smoked paprika, flat teaspoon of cumin, 2 teaspoons of dried oregano and solid few shakes of Tabasco sauce. Cook and stir for a few minutes until mixture becomes coloured from the spices cooking through it.

Add meat and cook until brown.

Add tomato paste and diced chipotle peppers and cook out until it just starts to caramelise on the walls of the pot. Add the adobo sauce from the chipotle can to taste now as well (warning – hot!)

Add can of diced tomatoes (drained) and kidney beans (drain and rinse well first). Cook for a few minutes.

Add Guinness. Cook until most of the beer has evaporated.

Add beef stock. Bring to boil. Add sugar until the mix in the pot is slightly less sweet than you want it to be (the sauce will reduce and sweetness will increase at the end). Alternatively, add the sugar when you add the tomato paste (it will add a little to the caramelisation of the paste and add a bit of extra flavour – best for second time you cook it, so you know how much you need)

Taste the mix after it starts to boil. Add a teaspoon of dried oregano and a little extra smoked paprika if the mix isn’t as smokey in flavour as you’d like. Add tabasco sauce for extra heat.

Simmer uncovered for 1.5 hours and add the lid when the mix is just a bit wetter than you want. (e.g. you want it wetter for serving with rice than you do for tacos or nachos). Let stand for at least 1/2 hour with heat off and lid on before serving (you can give it a reheat before serving if needed and add a little water to the simmering if it starts to dry out.)

Some folks stir fresh oregano and diced chili through before serving. It doesn’t float my boat, but it may well yours.

Assembly Primer Parts 6 — Moving Data — ARM

My notes for where ARM differs from IA32 in the Assembly Primer video Part 6 — Moving Data.

(There is no separate part 5 post for ARM — apart from the instructions, it’s identical to IA32. There’s even support for the .bss section, unlike SPU and PPC)

Moving Data

We’ll look at MovDemo.s for ARM. First, the storage:

.data

    HelloWorld:
        .ascii "Hello World!"

    ByteLocation:
        .byte 10

    Int32:
        .int 2
    Int16:
        .short 3
    Float:
        .float 10.23

    IntegerArray:
        .int 10,20,30,40,50

It’s the same as for IA32, PPC and SPU. Like the first two, ARM will cope with the unnatural alignment.

1. Immediate value to register

.text
.globl _start
_start:
    @movl $10, %eax

    mov r0, #10

Move the value 10 into register r0.

Something to note: the ARM assembly syntax has some slightly differences. Where others use # to mark the start of a comment, ARM has @ (although # works at the start of a line). Literal values are prefixed with #, which confuses the default syntax highlighting in vim.

2. Immediate value to memory

    @movw $50, Int16

    mov r1, #50
    movw r0, #:lower16:Int16
    movt r0, #:upper16:Int16
    strh r1, [r0, #0]

We need to load the immediate value in a register (r1), the address in a register (r0) and then perform the write. To quote the Architecture Reference Manual:

The ARM architecture … incorporates … a load/store architecture, where data processing operations only operate on register contents, not directly on memory contents.

which is like PPC and SPU, and unlike IA32 — and so we’ll see similarly verbose alternatives to the IA32 examples from the video.

I’m using movw, movt sequence to load the address, rather than ldr (as mentioned in the previous installment).

strh is, in this case, Store Register Halfword (immediate) — writes the value in r1 to the address computed from the sum of the contents of r0 and the immediate value of 0.

3. Register to register

    @movl %eax, %ebx

    mov r1,r0

mov (Move) copies the value from r0 to r1.

4. Memory to register

    @movl Int32, %eax

    movw r0, #:lower16:Int32
    movt r0, #:upper16:Int32
    ldr r1, [r0, #0]

Load the address into r0, load from the address r0+0. Here ldr is Load Register (immediate).

5. Register to memory

    @movb $3, %al
    @movb %al, ByteLocation

    mov r0, #3
    movw r1, #:lower16:ByteLocation
    movt r1, #:upper16:ByteLocation
    strb r0, [r1, #0]

Once again the same kind of thing — load 3 into r0, the address of ByteLocation into r1, perform the store.

6. Register to indexed memory location

    @movl $0, %ecx
    @movl $2, %edi
    @movl $22, IntegerArray(%ecx, %edi, 4)

    movw r0, #:lower16:IntegerArray
    movt r0, #:upper16:IntegerArray
    mov r1, #2
    mov r2, #22
    str r2, [r0, r1, lsl #2]

A little more interesting — here str is Store Register (register) which accepts two registers and an optional shift operation and amount. Here lsl is logical shift left, effectively multiplying r1 by 4 — the size of the array elements.

(GCC puts asl here. Presumably identical to logical shift left, but there’s no mention of asl in the Architecture Reference Manual. Update: ASL is referenced in the list of errors here as an obsolete name for LSL)

Two source registers and a shift is still shy of IA32’s support for an calculating an address from a base address, two registers and a multiply.

7. Indirect addressing

    @movl $Int32, %eax
    @movl (%eax), %ebx

    movw r0, #:lower16:Int32
    movt r0, #:upper16:Int32
    ldr r1, [r0, #0]

    @movl $9, (%eax)

    mov r2, #9
    str r2, [r0, #0]

More of the same.

Concluding thoughts

In addition to the cases above, ARM has a number of other interesting addressing modes that I shall consider in more detail in the future — logical operations, auto-{increment, decrement} and multiples. Combined with conditional execution, there are some very interesting possibilities.

Other assembly primer notes are linked here.

Assembly Primer Part 4 — Hello World — ARM

On to Assembly Primer — Part 4. This is where we start writing a small assembly program for the platform. In this case, I don’t know the language and I don’t know the ABI. Learning these from scratch ranges from interesting to tedious :)

Regarding the language (available instructions, mnemonics and assembly syntax): I’m using the ARM Architecture Reference Manual as my reference for the architecture (odd, I know). It’s very long and the documentation for each instruction is extensive — which is good because there are a lot of instructions, and many of them do a lot of things at once.

Regarding the ABI (particularly things like argument passing, return values and system calls): there’s the Procedure Call Standard for the ARM Architecture, and there are a few other references I’ve found, such as the Debian ARM EABI Port wiki page.

“EABI is the new “Embedded” ABI by ARM ltd. EABI is actually a family of ABI’s and one of the “subABIs” is GNU EABI, for Linux.”

– from Debian ARM EABI Port

System Calls

To perform a system call using the GNU EABI:

  • put the system call number in r7
  • put the arguments in r0-r6 (64bit arguments must be aligned to an even numbered register i.e. in r0+r1, r2+r3, or r4+r5)
  • issue the Supervisor Call instruction with a zero operand — svc #0

(Supervisor Call was previously named Software Interruptswi)

Just Exit

Based on the above, it’s not difficult to reimplement JustExit.s (original) for ARM.

.text

.globl _start

_start:
        mov r7, #1
        mov r0, #0
        svc #0

mov here is Move (Immediate) which puts the #-prefixed literal into the named register.

Hello World

Likewise, the conversion of HelloWorldProgram.s (original) is not difficult:

.data 

HelloWorldString:
      .ascii "Hello World\n"

.text 

.globl _start 

_start:
      # Load all the arguments for write () 

      mov r7, #4
      mov r0, #1
      ldr r1,=HelloWorldString
      mov r2, #12
      svc #0

      # Need to exit the program 

      mov r7, #1
      mov r0, #0
      svc #0

This includes the load register pseudo-instruction, ldr — the compiler stores the address of HelloWorldString into the literal pool, a portion of memory located in the program text, and the 32bit address is loaded from the literal pool (more details).

When compiling a similar C program with -mcpu=cortex-a8, I notice that the compiler generates Move (immediate) and Move Topmovw and movt — instructions to load the address directly from the instruction stream, which is presumably more efficient on that architecture.

Assembly Primer Parts 1, 2 and 3 — ARM

I had started a series of posts on assembly programming for the Cell BE PPU and SPU, based on the assembly primer video series from securitytube.net. I have recently acquired a Nokia N900, and so thought I might take the opportunity to continue the series with a look at the ARM processor as well.

Wikipedia lists the N900’s processor as a Texas Instruments OMAP3430, 600MHz ARMv7 Cortex-A8. I’m not at all familiar with the processor family, so I’ll be attempting to find out what all of this means as I go :P

I’ve set up a cross compiler on my desktop machine using Gentoo’s neat crossdev tool (built using crossdev -t arm-linux-gnueabi). The toolchain builds a functional Hello, World!

(I note that scratchbox appears to be the standard tool/environment used to build apps for Maemo — I may take a closer look at that at a later date)

I have whatever the latest public ‘stable’ Maemo 5 release is on the N900 (PR 1.3, I think),  with an apt-get install openssh gdb — thus far, enough to “debug” a functional Hello, World!

What follows are some details of the Cortex-A8 architecture present in the N900, particularly in how it differs from IA32, as presented in the videos Part 1 — System Organisation, Part 2 — Virtual Memory Organization and Part 3 — GDB Usage Primer. I’ve packed them all into this post because gdb usage and Linux system usage are largely the same on ARM as they are on PPC and IA32.

Most of the following information comes from the ARM Architecture Reference Manual.

(The number of possible configurations of ARM hardware makes it interesting at times to work out exactly which features are present in my particular processor. From what I can tell, the N900’s Cortex-A8 is ARMv7-A and includes VFPv3 half, single and double precision float support, and NEON (aka Advanced SIMD). I expect I’ll find out more when I actually start to try and program the thing. As to which gcc -march, -mcpu or -mfpu options are most correct for the N900 — I have no idea.)

1. Registers

Integer

There are sixteen 32bit ARM core registers, R0 to R15, where R0–R12 are for general use. R13 contains the stack pointer (SP), R14 is the link register (LR), and R15 is the program counter (PC).

The current program status register (CSPR) contains various status and control bits.

VFPv3 (Floating point) & NEON (Advanced SIMD)

There are thrirty two doubleword (64bit) registers, that can be referenced in a number of ways.

NEON instructions can access these as thirty two doubleword registers (D0–D31) or as sixteen quadword registers (Q0–Q15), able to be used interchangeably.

VFP instructions can view the same registers as 32 doubleword registers (again, D0–D31) or as 32 single word registers (S0–S31). The single word view is packed into the first 16 doubleword registers.

Something like this pic (click to embiggen):

VFP in this core (apparently) supports single and double precision floating point data types and arithmetic, as well as half precision (possibly in two different formats…).

NEON instructions support accessing values in extension registers as

  • 8, 16, 32 or 64bit integer, signed or unsigned,
  • 16 or 32bit floating point values, and
  • 8 or 16bit polynomial values.

There’s also a floating point status and control register (FPSCR).

2. Virtual Memory Organisation

On this platform, program text appears to be loaded at 0x8000.

After an echo 0 > /proc/sys/kernel/randomize_va_space, the top of the stack appears to be 0xbf000000.

3. SimpleDemo

Compared to the video, there are only a couple of small differences when running SimpleDemo in gdb on ARM.

Obviously, the disassembly is not the same as for IA32. Rather than the call instructions noted in the video, you’ll see bl (Branch with Link) for the various functions called.

Where the return address is stored on the stack for IA32, the link register (lr in info registers output) stores the return address for the current function, although lr will be pushed to the stack before another function is called.

(From a cursory googling, it seems that to correctly displaying all VFP/NEON registers requires gdb-7.2 — I’m running the 6.8-based build from the maemo repo. crossdev will build me a gdb I can run on my desktop PC — crossdev -t arm-linux-gnueabi –ex-gdb — but I believe I still need to build a newer gdbserver to run on the N900.)

Other assembly primer notes are linked here.
Proposed updates for praypal.org.au 2011/02/11

Diamond-Square — Randomness, continuity and animation

Randomness is nice, except when you have too much.

It’s easy to blast random pixels all over the screen, but it’s much nicer when there’s some continuity in the randomness.

For diamond-square interpolation, I was looking for a way to generate (and use) random seed values to produce continuous-looking results within and between calculated tiles, as well as varying these seed values over time in a somewhat appealing fashion.

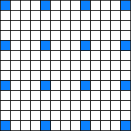
To calculate the values for a given tile requires the corner values of that tile along with the corner values of the eight surrounding tiles — that is, all the blue pixels in the picture are needed to calculate the pixels required to calculate the pixels in the centre tile.

The corner values from one tile effects the calculation of the tiles adjacent.  For this reason, the corner values of each tile are state that must remain constant for the entire frame.

To render a full 1920×1080 frame, 15×9 tiles are required, with 16×10 corner values.  To calculate the tiles around the frame border, further un-rendered tile data is required to correctly seed each of these border tiles.  The result of this is that 18×12 random pixel values are needed to define the full set of tiles for a 1080p frame, which means the seeds for the tiles of a frame can be stored in 18x12x4 = 864 bytes.  Not unreasonable.

When rendering each tile, these seed values are first placed in the appropriate 16 locations (taking into account the compressed outer regions), and the interpolation takes place.  (Interpolation is performed on the seed values and, later, using only values calculated during a previous iteration — which means there’s no requirement to zero memory between tiles)

The result with just this looks quite reasonable (imho) — there’s decent interpolation of random values across the screen.  These random seed values can also be permuted without too much difficulty between frames — I’ve tried some trig-function based methods to give a sense of continuous, directional changes.  It works but I’m sure there’s better options.

As for the random perturbing of interpolated values, I’ve tried a few methods and not achieved anything that I’ve been all that happy with.  The problem I’ve had is finding/generating a suitably random value of appropriate scale, and applying it to the pixel value fast enough.

(As I reach the end of this, I have the impression that what I’ve put together is almost, but not entirely unlike, Perlin noise —  you could possibly say that it has a really clumsy interpolation function.  I have a much better understanding of Perlin noise than when I began, and it really looks like I should have tried that.  Learning is Good.)

At some stage in the not too distant future, I hope to perform some screencaps and post some actual images and maybe even a video.  And fwiw I’ll post the source code, too.

Diamond-Square — DMA lists and dirty tricks

There’s a hole in my dataset, dear MFC, dear MFC…

There’s a block of local store that holds a tile of pixels that need to be DMAd out to main memory.  128 lines makes performing many smaller transfers more complex , so we’ll try DMA lists why not.  The problem here is that the pixel data for each line does not match up directly with the next — between each is stored the extra lines of extra-tile information that was needed for the calculation.  When using DMA lists to transfer data to many memory, the source for each DMA transfer starts where the previous one ended. This means that between each DMA there’s (148-128)×4=80 bytes of information that we don’t want to see on the screen.

There’s a lot of things that are “best-practice” for SPU DMA, particularly relating to size and alignment of transfers, and I’m typically a religious adherent.  In this case, I did not comply with best practice and still met my time budget and only feel a small amount of shame :P

Overall, less time is spent performing DMA than is spent calculating pixels, so further optimising DMA for this particular program is unnecessary.

When transferring tiles from the SPU to the framebuffer, there’s three cases of particular interest:

  1. Tiles on the right edge of the screen
  2. Tiles on the lower edge of the screen
  3. The Other Tiles
Tile data in local store

3. The Other Tiles

These are the easy ones.  They will never need to be trimmed to fit the screen edges, and if drawn in the right order have the wonderful characteristic that the extra data needed can be DMAd to the framebuffer and will be overwritten by pixel data from a later tile.  There’s no special case needed, just draw each pixel line and — all data between pixel lines — to the screen.

Tile data drawn to screen

(For the diagrams, the amount of overdraw is far greater than the actual tile part — this is a consequence of the small size.  It’s a much smaller percentage for 128 pixel tiles.  I’ll post some actual screengrabs here sometime…)

1. Tiles on the right edge of the screen

Overdraw isn’t the answer in this case. It is not possible to overdraw on either the left or right of the rightmost tile in a way that will be correct when the screen is finished.  Instead, the extra information (including any portion that may not fit onto the visible screen) must be dealt with some other way.

My solution, ugly as it is, is to write each surplus portion of a tile to a scratch location in memory — every one of them to the same location.  It works :|

2. Tiles on the lower edge of the screen

These tiles are really just like the others, except they’ll stop a few lines short.  They’re still fully calculated, but only the visible lines are transferred.

(In hindsight, increasing the spacing between lines would help reduce the alignment and size problem here.  Adding an extra 48 bytes to each tile would allow every transfer to be optimally aligned and sized.  And would probably make no measurable difference to the total runtime.  Heck, there’s probably enough time to repack the data in local store before performing the DMA. There’s not that much…)

Diamond-Square — Tiled rendering and space

I started with the assumption of 128×128 pixel diamond-square tiles — they’re a power of two big (which makes them simpler to calculate), 512 bytes wide, 128 lines tall and 64KB in total size, which means two will fit in local store.

So, questions: What points outside this area are required to calculate all the points within?  How much space is required to render one of these tiles?

(There’s a smaller example pictured, again with a different colour for each iteration of the calculation)

If the tile is to be 4×4, the centre area is 5×5 with overlap between tiles.  Additionally, to calculate a 4×4 tile, fully calculating a 7×7 area is required, not counting the sparsely calculated pixels around the outside.

Scaling this up to 128×128 pixel tiles and it should be clear that at least 131×131 pixel area is required, not counting those extras around the outside.  How to deal with those?

One thing that is clear is that they’re sparsely filled, and that calculated values only appear on certain lines.  In fact, the number of lines required around the outside of a tile is (1+log2n) where n is the tile width.  For the 4×4 tile pictured, three extra lines are needed on each side of the tile.  For a tile 128 lines across, 8 extra lines are needed.

So all the values to calculate a given tile can be stored in in (129+8+8)×(129+8+8) = 145×145 pixels.  Rounding up to get quadword aligned storage gives a total of 148×145×4 bytes — 85,840 bytes per tile.  171,680 bytes is a big chunk of local store, but it’s probably better to be using it for something

Based on that, it’s not particularly difficult to generate the data for a tile.  Start the tile with its starting values (more on those in another post) in the corners of the squares (the blue ones in the picture), and then calculate the remaining points.  There’s some special cases required for each of the sides, but it’s nothing particularly tricky, just keeping track of row/column indexes for particular iterations.

The outer points make up only a very small percentage of the total points that need to be calculated — more than 50% of the points are calculated in the last diamond and square iterations, and due to the proximity and alignment of the points accessed, their calculation can be usefully optimised.  (I might write a post about that sometime…)

Diamond-Square — Data dependency and SPU

To work out a suitable way to divide a 1080p screen into pieces that a SPU could work effectively with for the diamond-square problem took some trial and error.  First, some fundamentals.

DMA

The SPU interacts with the framebuffer through the use of DMA operations, which have the following characteristics:

  • larger transfers are more efficient than smaller ones
  • there are alignment constraints
  • there can be a tradeoff between performing several small transfers to cope with DMA size/alignment constraints, and fetching a larger aligned area, modifying it and writing it back
  • modifying a region of memory requires a DMA get and put operation — extra work, complexity (buffer management and time)
  • a single SPU can have a maximum of 16 transfers in-flight at a given time, and will block if any more are issued
  • DMA lists can be used to effectively issue more than 16 transfers at a time, but there are greater restrictions on the placement of data in local store

Data relationships

To calculate each point in diamond-square required the values from four others.

When calculating the centre point of a square, the four corners are located on two different lines and the centre point is written to the centre line between those two.  (Reading from two lines, writing to one)

When calculating the centre point of a diamond, the four corners are located on three different input lines and the centre point is located on the same centre line as two of the points (Reading from three lines, writing to one of those)

For a given iteration of diamond-square, all input data has been generated in a previous iteration — that is, no point depends on another point calculated in the same iteration of the algorithm.  This gives some flexibility as to the ordering of point calculation.

First attempt — whole lines

My first thought was to optimise for DMA throughput: large transfers are much more efficient than smaller ones, and the independence of points in a single iteration means that points can be calculated on a line by line basis.  Pseudo this:

square(line_number, square_size)
    top = dma_get(line_number)
    centre = dma_get(line_number + square_size/2)
    bottom = dma_get(line_number + square_size)
    for(i = 0; i < line_length; ++i)
        calculate_square_centre_value(top, centre, bottom, i, square_size)
    dma_put(centre)

Whole lines are fetched, which is reasonably efficient (1920×4 bytes = 7680, 7680%128 = 0, so it’s a fine size for efficient DMA), and there’s plenty of scope for optimisation:

  • lines may be prefetched
  • lines may be reused between iterations: the bottom line for one row of squares is the top line of the next.  For diamonds, two lines are reused from one row to the next

I spent quite a bit of time on this approach, to try and get it working to my satisfaction, but in the end I discarded it.  The problem for me became one of complexity — the prefetches, special cases (sides, corners) and line reuse were all written and applied for the general-case implementation (i.e. parameterised by square_size like the pseudo code above). This made it extraordinarily cumbersome to write optimised cases for the smallest square sizes — where most of the pixels are calculated and thus most runtime is spent.

In summary, I was optimising the wrong things.

There were also aspects of the implementation that I had not fully considered with this method, and failed to make progress with, particularly proper handling of the side and corner special cases, and animation.

(In hindsight, I suspect I could have simplified this approach, solved the other problems and met the time budget — but probably only knowing what I know from my next attempt.)

Second attempt — tiles — problems

Tiling was an approach I had considered and discarded early on.  Where whole lines are a clear win for DMA efficiency, tiles are much less so — the largest square tiles I could envision were 128×128 pixels, being 64KB (twice for a double buffered implementation), and the 512B line length is not a great performer.  Additionally, the limit on the number of in-flight DMA transfers makes this method seem more risky — writing 128 lines per tile requires writing lines as the calculation of each is completed and hoping that computation is slower than DMA, which is probable but not assured.

DMA lists are promising — except that diamond-square requires 2n+1 pixel squares, so it’s actually a 129×129 pixel tile (for calculation), and DMA lists still need to transfer those little extra inner parts between transfers.

On top of that, recall that diamond-square requires a large number of points from outside a tile to be calculated to be able to complete the points within a tile — if stored sparsely, 8 times as much space as for the target tile.

So I didn’t start with this idea, but after discarding the previous approach I was able to work out ways around these problems and implement a basic and functional implementation in the time I spent flying and waiting in airports on my way home from GCAP.  I’ll expand on the implementation in a later post.